
If you’ve ever found yourself in a linking marathon ? Resetting dozens of fixtures, clicking the link button repeatedly, and wishing you had a better system ? You’re not alone. CRMX linking keys exist to solve exactly this problem, but they come with some quirks that aren’t always obvious. Let’s break down everything you need to know to use linking keys like a pro.
What is a CRMX Linking Key?
A CRMX linking key is an 8-digit code that automatically pairs your CRMX receivers with your transmitter, eliminating the manual linking dance. Think of it as a password that both your transmitter and fixtures share, once they’re on the same key, they connect instantly.
This becomes invaluable when you’re managing multiple universes or working with rotating crews. Studio owners can set up overhead fixtures once and let different teams walk in ready to work. Pre-lighting crews can handle all the pairing, then hand off to the main team with their own DMX kit without missing a beat.
Here’s the best part: linking keys work with both CRMX Classic and CRMX². Despite common misconceptions, you don’t need the CRMX² update to use this feature, they’re completely separate functionalities.

The Stardust Exception You Need to Know
Here’s where things get interesting. The LumenRadio Stardust handles linking keys differently than most other transmitters, and understanding this difference will save you headaches on set.
Stardust approach: One linking key for the entire unit (whether configured for 4 universes in CRMX Classic or 8 universes in CRMX²). You manually select outputs A through H on your receivers.
Standard approach (Cerise, TimoTwo devices, Moonlite, Aputure Sidus, Ratpac Satellite): One unique linking key per universe, with only universe A usable per key.
This is a design choice by LumenRadio, not a limitation of the technology. The Stardust can’t do multiple keys, and everything else can’t do a single key across multiple universes. Your fixtures might let you select different outputs even when not connected to a Stardust, but with transmitters like Cerise, only output A will actually work.
Another critical point: if you’re using a multi-chip transmitter like Cerise, each output needs a different linking key. Setting the same key on multiple outputs causes them to fight over the same receivers, resulting in bugs, glitches, and unwanted flashes.

Choosing Secure Linking Keys
Your linking key is essentially a password—anyone who knows it can take control of your fixtures. Avoid obvious choices like 12345678 or 11111111. Treat it like you would any other security credential on set.
There’s also a technical consideration: until recently (fixed in firmware 1.1.1.0), linking keys with four or more consecutive zeros (like 00000000 or 00001111) caused issues where some receivers would link correctly while others wouldn’t. If you’re running older firmware, avoid these patterns.
Using Linking Keys with Non-Supporting Fixtures
What if your DMG DASH or generic CRMX receiver doesn’t officially support linking keys? There’s a simple workaround.
Set your desired linking key in the transmitter first, then manually link your fixtures using the link button. The manual linking process essentially sends the key to the receivers, which memorize it until they’re reset or unlinked. Problem solved.
")
Advanced Technique: Transmitter Cloning
Here’s an experimental but potentially useful trick: two transmitters can use the same linking key to create seamless coverage across large areas. While having them close together causes conflicts, placing transmitters at intervals allows receivers to jump smoothly between them as they move in and out of range.
This works beautifully for car chases, actors with props on expansive sets, or any situation where maintaining continuous wireless coverage is challenging. Just remember this is advanced territory—test thoroughly before show time.

Setting Linking Keys on Cerise
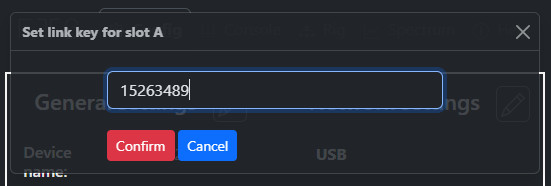
Using linking keys with Cerise couldn’t be simpler. Open the Cerise WebUI and locate the linking key button next to the link and unlink buttons for your desired output. Enter your 8-digit key and press “Confirm.” (Cerise beta fw 1.8.1 and later will also display the key in that popup, even after a reboot, so no need to write it down or memorize it).
Keep in mind:
- This resets any already-linked receivers, requiring them to be relinked
- Each output on a 2U or 4U Cerise needs a different linking key
- Receivers must use output A or 1 for each different linking key
- Both Cerise and TimoTwo modules might need to be updated to the latest firmware for this feature (CRMX fw 1.0.7.2 and later / Cerise fw 1.5.1 and later)
The linking key system transforms how you work with wireless DMX, especially on complex productions. Once you understand the Stardust exception and the one-key-per-universe rule for standard transmitters, you’ll wonder how you ever managed without it.
Ready to simplify your wireless DMX workflow? Cerise makes linking key management intuitive with its straightforward WebUI, no complicated menus or hidden settings.