
What if I want Wi-Fi ?
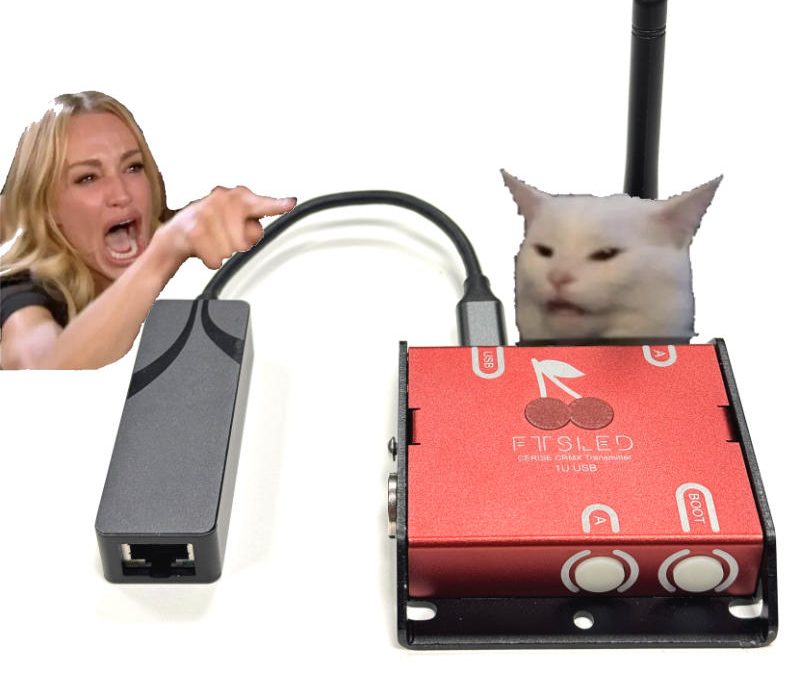
Can I use a USB C to Ethernet adapter into the 1U like the image above ?
Sadly no, but it doesn’t mean you still can’t plug it in a switch or even a Wi-Fi router
We know the philosophy of Cerise is to ditch bad Wi-Fi and have a great all around solution for most RF environnements, but what happens when you want the extra freedom or have a good enough grasp on your RF environnement to use Wi-Fi in a reliable way ?
This in depth guide goes into getting your Cerise working with most Wi-Fi routers out there, whether is it via USB, Ethernet, using Art-Net Unicast or sACN Multicast, we’re here to guide you through every step.
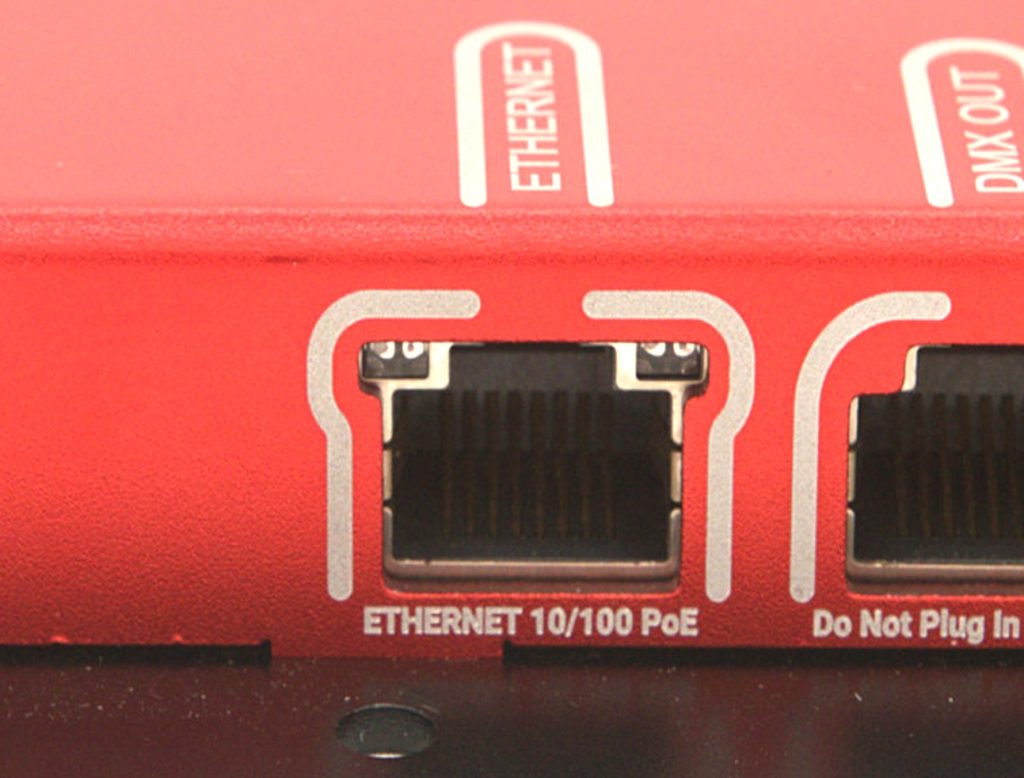
One clear difference between the Cerise 1U and the 2U/4U, is the lack of an Ethernet port. We wanted to make the 1U as small and affordable as we could so we decided to not add any ethernet/PoE hardware in it. However the USB-C port has one trick up its sleeve, as it works as a USB CDC-NCM device, it works similarly as using your phone in USB tethered mode.
In this tutorial we’re using the Gli-Net GL-MT3000 Beryl AX, but it can be done with similar routers from Gli-Net such as the smaller and more affordable Mango that only does 2.4GHz if you only want wired ethernet, or the newer GL.iNet GL-BE3600 (Slate 7) however this one consumes more power and has way more throughput than we need so it’s hard to justify the price difference (maybe the range is much better, I don’t know, I haven’t tested it). It can also be done on the cheaper GL.iNet GL-SFT1200 (Opal) if you want dual-band 5GHz Wi-Fi on a budget but I’d recommend against as it’s only Wi-Fi gen 5 and not 6, if you want to know more about the benefits of Wi-Fi 6, check this section.

Ethernet (only for the 2U & 4U)
Low difficulty
Limitations :
- Doesn’t work with the 1U
- You will need to power your Cerise independently via a dedicated power adapter or USB socket if your switch doesn’t output PoE (Power over Ethernet)
GliNet
- Setup your router, can scan the QR code to connect
- Connect Cerise to the router LAN port
- Go to 192.168.8.1, and navigate to clients, Cerise IP address should be displayed
- Open Blackout Lighting Console and setup using sACN or Art-Net with the Cerise IP address in step 3
- (optional) Setup a device reservation for the IP address, insuring your IP address doesn’t change even if you power your router down or plug in new devices.

USB Basic (supports 1/2/4U but only Art-Net Unicast)
Medium difficulty
Limitations :
- Art-Net Unicast is the only protocol that works
GliNet
- Setup your router, can scan the QR code at the back of the router to connect to the Wi-Fi network.
- Go to the Cerise configuration page http://169.254.XX.1/
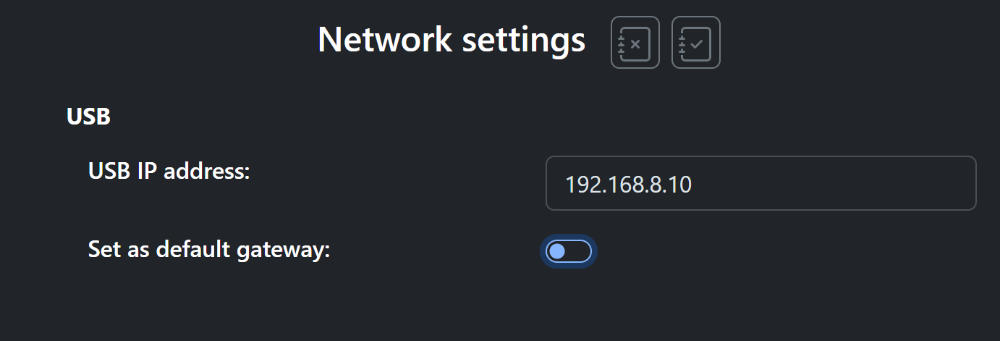
- Set a USB IP address in the appropriate range (not 192.168.8.x or 9.x as these are used by the router. I personally set 192.168.11.1). Make sure “Set USB default gateway” is DISABLED.
- Connect to the router’s Wi-Fi network and go to the page http://192.168.8.1/
- Plug cerise in the USB A port and activate USB tethering.
- Then go to the USB IP address initially defined in step 1.
Tethering will now be activated at startup.
The router takes about 1 minute to start up, so keep this in mind.
Troubleshooting steps :
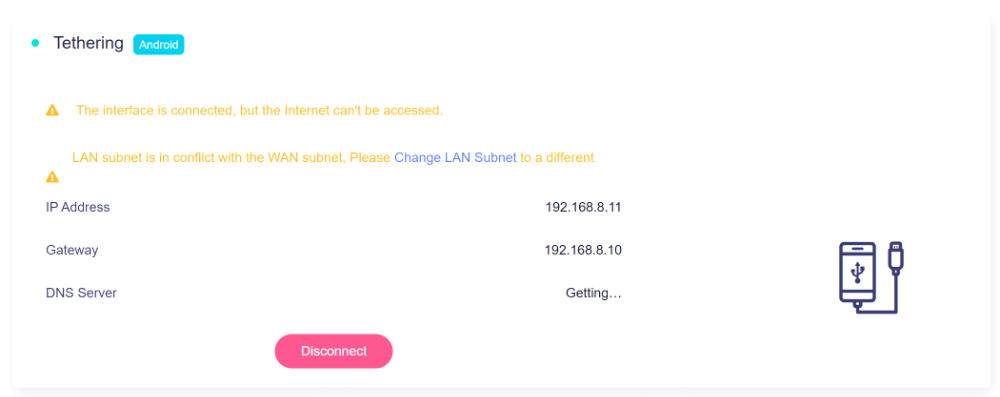
Here the gateway is 192.168.8.10 this means “Set default gateway” is ACTIVE, also the subnet is the same (192.168.8.x) as the gli-net routers so there’s a conflict.
As the subnets and devices are on separate networks, sACN and Art-Net broadcast won’t work, if you want to use these, look into the advanced USB setup below.

USB Advanced (supports 1/2/4U & sACN/Art-Net)
High difficulty
GliNet
- Setup your router, can scan the QR code at the back of the router to connect to the Wi-Fi network.

- Go to the Cerise configuration page http://169.254.XX.1/
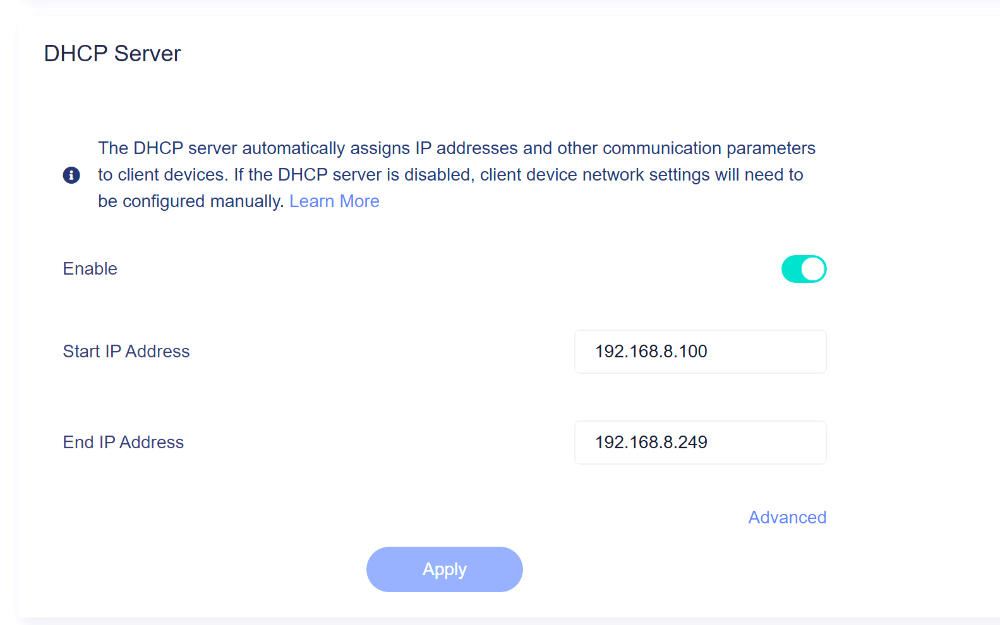
- Set a USB IP address in the appropriate range (I personally set 192.168.8.10 as x.100 to x.249 is DHCP range by default and the router’s IP is x.1). Make sure “Set USB default gateway” is DISABLED.


- Plug Cerise in the USB A port of the router (you can use a hub if you want to plug more than 1 Cerise, you might need to power 2U and 4U externally).
- Connect to the router’s Wi-Fi network and go to the page http://192.168.8.1/
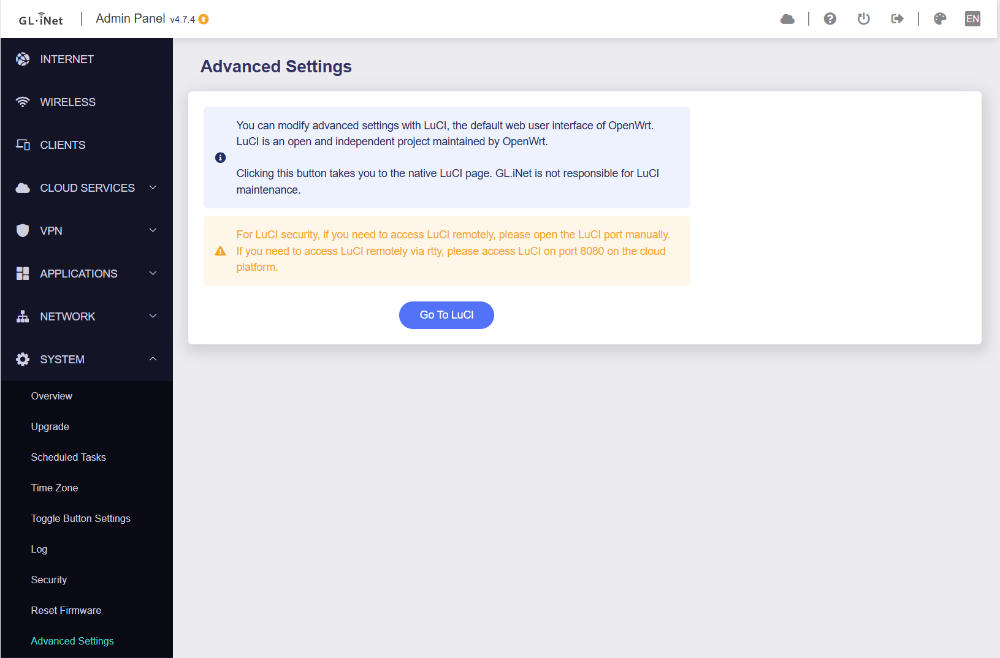
- Go to SYSTEM > Advanced Settings > click “Go To LuCI”

- Type in the same admin password configured in step 1, username “root”
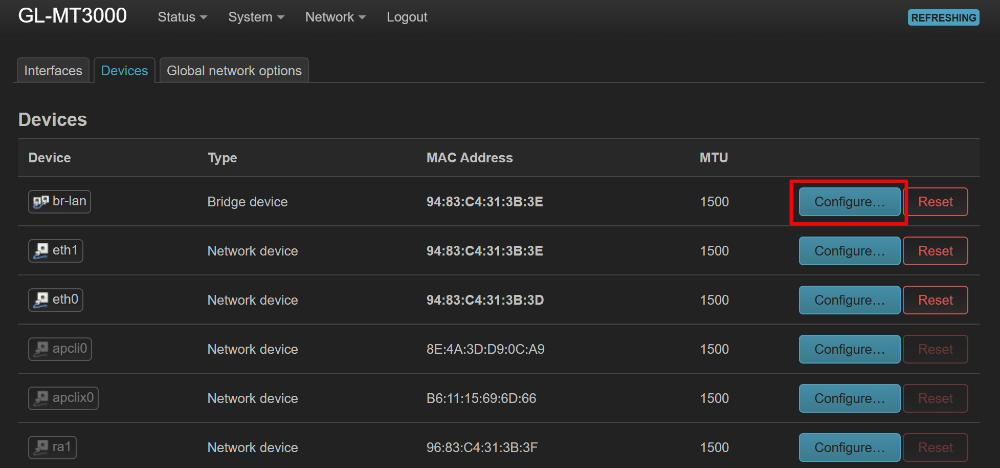
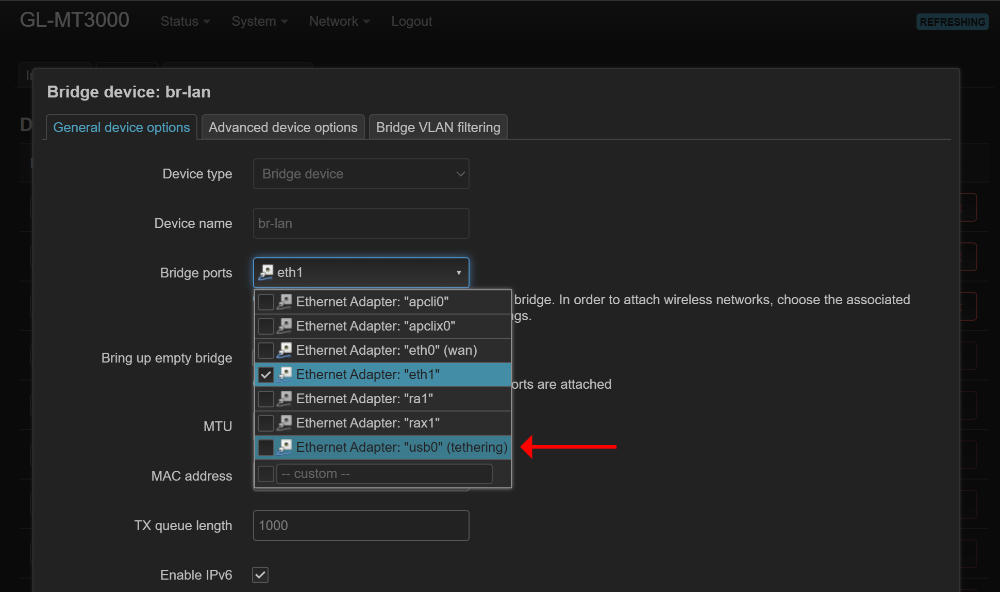
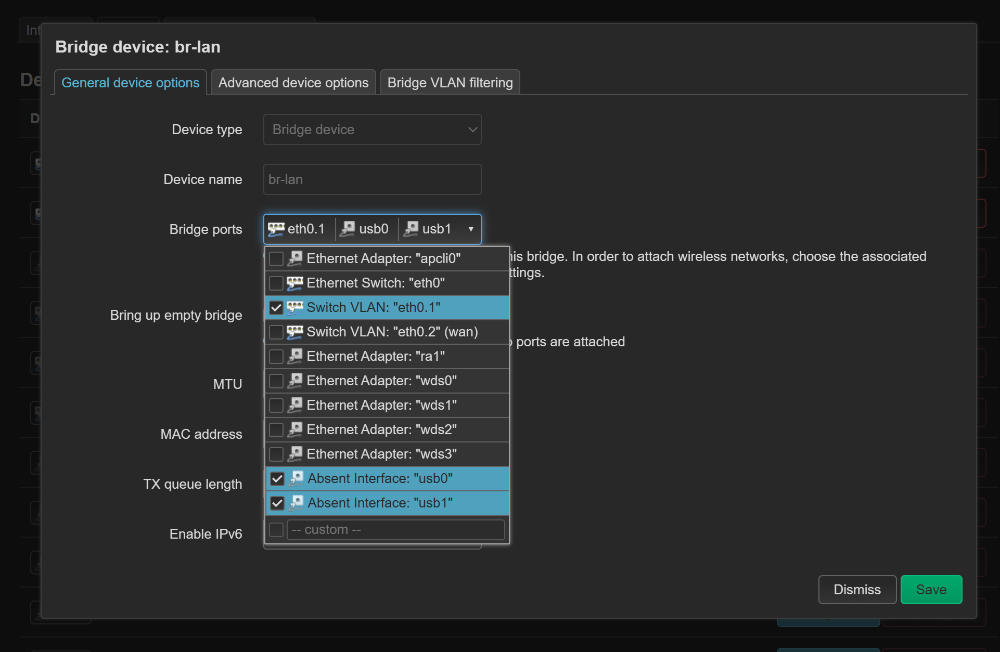
- Go to Network > Interfaces > Devices tab (if it asks for ifname configuration migration, just click ok and wait the 10 secs) Note that the interfaces tab looks similar but it isn’t the correct one 😉
- Click “Configure” next to the “br-lan” line

- Under “Bridge ports”, add “usb0 (tethering)” and click “save” in the bottom right.

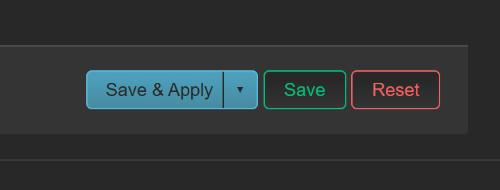
- At the bottom of the page, click “Save & Apply” and wait for it to restart, this can take a minute

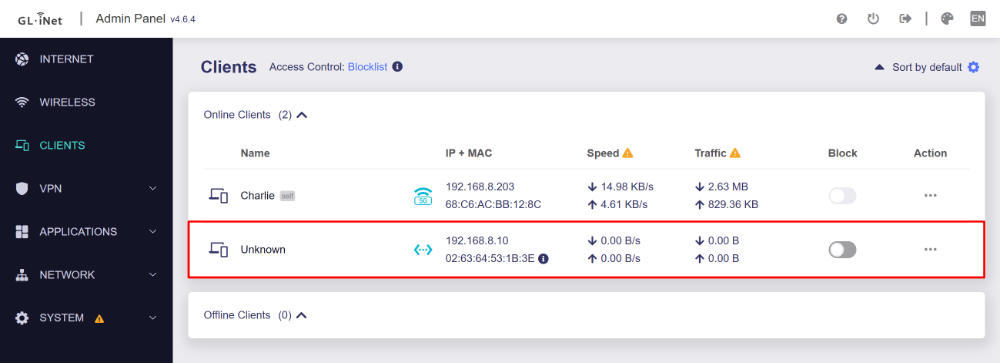
- Then go back to the gli-net router home page http://192.168.8.1/, your device should also show up under the “Clients” tab with the USB IP address initially defined in step 1

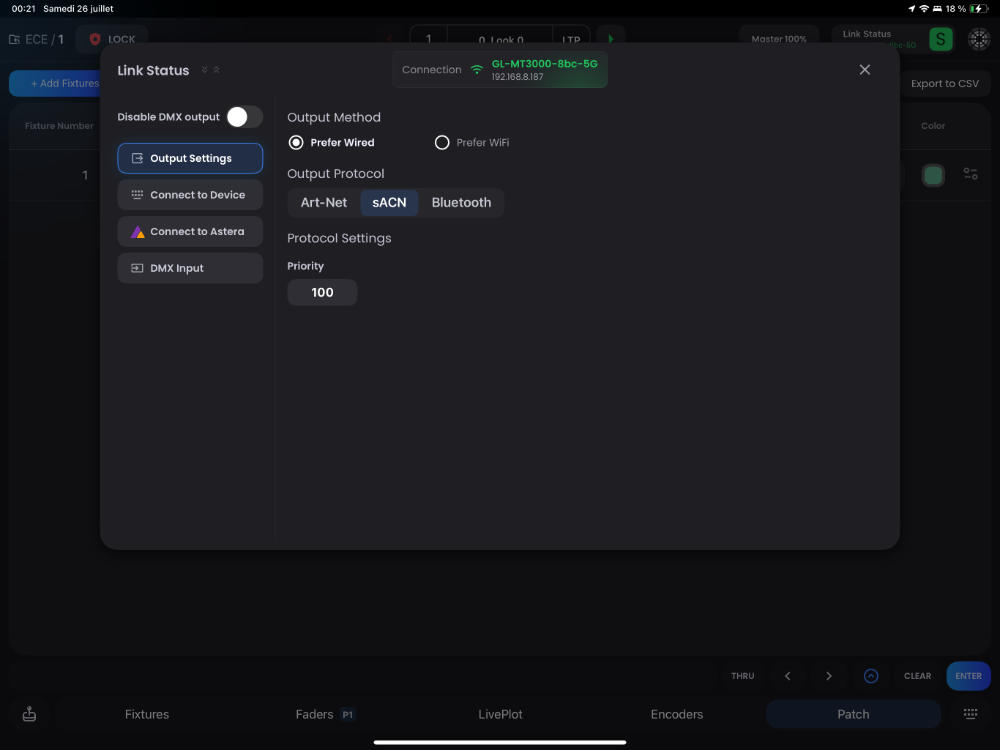
- Now you can go to the IP address in your web browser or use it in blackout as if it had built-in Wi-Fi.

- If you want to add a second device, repeat step 3 through 11 with a different IP in the same subnet (ie. 192.168.8.11) with usb1

Tethering will now be activated at startup.
The router takes about 1 minute to start up, so keep this in mind.
Troubleshooting steps :
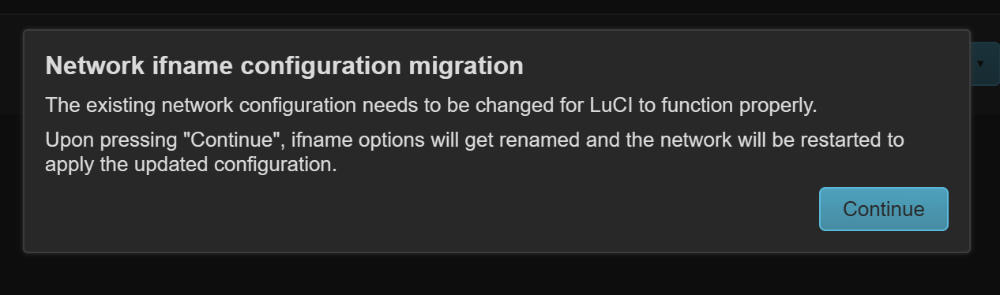
If you get an ifname configuration migration when opening LuCi for the first time, this is normal, press continue and wait a bit.
How to improve the reliability and range of the Wi-Fi

Reduce the Wi-Fi bandwidth to the minimum (20/40MHz when possible)
Most routers will let you configure a small bandwidth, of 20 or 40MHz depending on the frequency.
In normal use this is counter intuitive because it will reduce the throughput/speed but for lighting we generally don’t care about that (as 1 DMX universe is about 250kbps, so even at 40 universes which is just 10mbps so you’re still many times faster than that). However this means you occupy a smaller part of the RF spectrum and in turn you’re less prone to interference.
Use Wi-Fi 6 equipment (Wireless Access Point and Device)
Even if it doesn’t have 6GHz like the more expensive 6E or 7 routers (some Wi-Fi 7 routers also don’t support 6GHz btw, so be careful with the marketing BS), Wi-Fi 6 brings a ton of great features making it more reliable than it’s older counterparts.
In plain terms, Wi‑Fi 6 splits one highway into many lanes so more devices can drive at once without jamming, where older gen Wi-Fi would just give the whole highway to one vehicle at the time. It also gives each network a “color badge” so devices tune out other networks’ faint signals. With OBSS‑PD, your router learns to ignore far‑off chatter that won’t interfere, and lowers its own volume so nearby users can chat free of collisions. Finally, by stretching out its messages and adding a bit of buffer time between them, it avoids echoes and blurry overlaps in busy spots.
Overall it’s much better in areas with much RF noise.
If you’re trying to both use Wi-Fi 2.4GHz and CRMX
If your CRMX TX supports this, try blocking it from transmitting on the same band/channel as your Wi-Fi router.
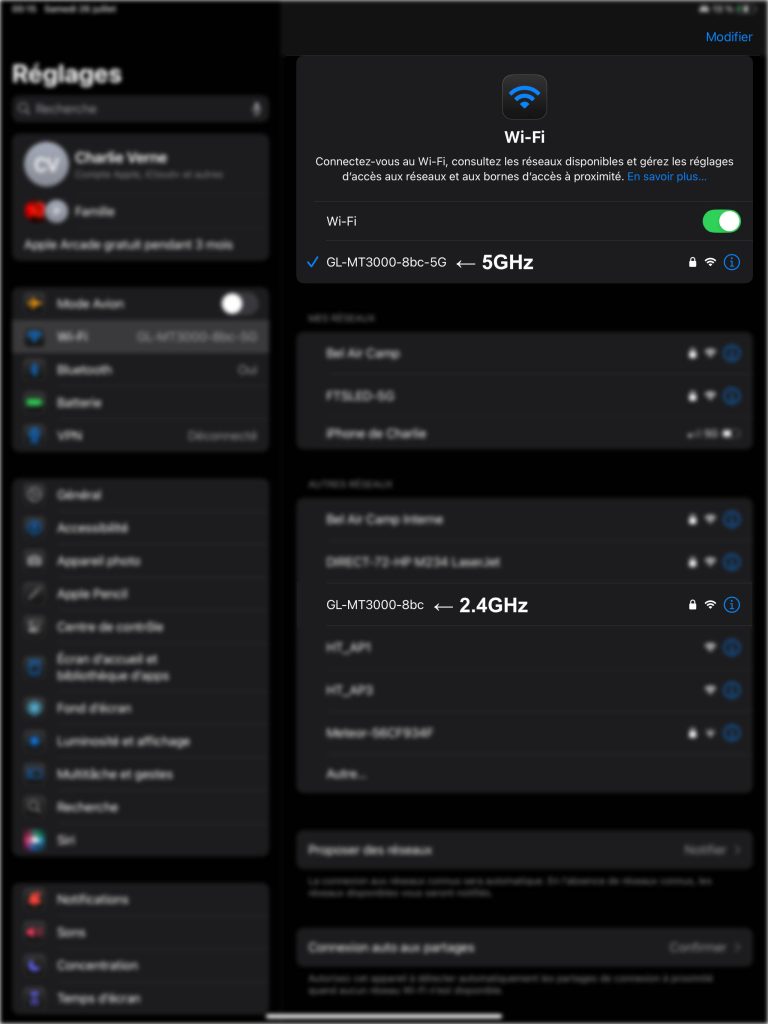
If you don’t know which one you’re using because you only have a single SSID (Wi-Fi name) then you might be able to rename them to different names in your Wi-Fi router (ie. MyWiFi_2G and MyWiFi_5G) or even disable one if you don’t use it (note that certain devices such as the Astera Art7 Wi-Fi only work over 2.4GHz).